
— High-rise condo construction has become the norm in urban Honolulu. Building vertically is the ‘highest and best use’ of limited available land. Today more than 60% of Oahu residents live in condos and the number keeps growing.
Honolulu condos offer some unique benefits including location conveniences, amenities, security, and a seemingly carefree ‘lock-and-go’ lifestyle.
See related article Condo or Single-Family Home?
One reason why condo living has gained popularity is that maintaining a single-family home with a yard can become overwhelming. But some condo owners mistakenly believe that the AOAO (Association Of Apartment Owners) automatically takes care of everything related to their condo.
The AOAO typically maintains the exterior and the common elements of the project. As an individual owner, you are responsible for maintaining the interior of your condo unit.
But there is more you need to know, especially if you own a high-rise condo.
Maintaining the interior often includes plumbing pipes that service your unit exclusively, even if they are hidden behind the walls! In other words, your responsibility extends beyond what you can see within your unit. – Are you surprised?
You might not be able to actually look behind your walls, but you should be aware of how you can monitor and maintain what is visible, practical and expected.
If you neglect to properly maintain your unit you can be held responsible for possible damages to neighboring units or adjacent common elements. The potential risk is even greater if you leave your condo vacant, or rent it to a tenant that isn’t diligent with notifying you of maintenance issues.
Hawaii Revised Statue §514B-138 gives associations the power to implement policies for the greater benefit of maintaining the building.
Today most condo associations have adopted policies that clarify the individual condo owner’s responsibilities regarding ‘high-risk components.’ These are condo components that could cause damage if not properly maintained by the owner. Plumbing water leaks cause by far the most damage in vertical condo living. Therefore most of the high-risk components are plumbing components.
Some AOAOs might schedule visual inspections of these high-risk components within each individual condo to monitor the condition and identify potential problems. The intent is to mitigate future damages, keeping insurance claims to a minimum, limiting insurance premium increases, and maintaining the quality of the building. Proactively monitoring and maintaining is a worthwhile investment.
With or without an inspection, you are ultimately responsible for any damages that could result. Your unit should not interfere with other owners enjoying the use of their neighboring condos.
As an owner you need to know:
a) Your condominium rules regarding required HO6 insurance coverage.
b) What are the high-risk components you are responsible for.
c) How to properly maintain them to mitigate damage.
Here are simple steps that might help protect you and your condo investment:
1) Carry Adequate HO6 Insurance Coverage
Every condominium building carries a building master insurance policy that covers fire, hurricane, and flood damages. The master policy is paid for through the maintenance fees. This policy covers all improvements at today’s replacement value as originally built. That means if you upgraded the original carpet to exotic Tigerwood floors, the master policy will only pay for today’s replacement cost of the original carpet but not for the upgraded Tigerwood floor.
The building master policy covers all claims but only after a predetermined amount that is called the ‘deductible.’ The deductible is applied per claim and not per unit. The master policy deductible may be charged back to you, the unit owner, especially if the damage claim is the result of a leak from your unit, even if the leak is behind the wall or below your floor! You need to know the deductible amount of the master policy. The deductible amount could range between $5K and $50K!
Example: The washer supply line in your condo catastrophically fails and floods your unit plus multiple units below causing $100K in water damage. The master insurance will cover the damage ‘as originally built’ and you will be responsible to pay the deductible amount, the first $5K to $50K of the damage claim.
Fortunately, you can buy an individual insurance policy aka HO6 policy that covers the deductible of the building’s master policy. A basic HO6 policy might cost between $160 and $350/year. This is a small premium to pay for the peace of mind the coverage provides. In fact, many condo buildings require that you show proof that you carry an HO6 policy. (see Hawaii Revised Statue §514B-143)
Here is a screen shot sample of one of my HO6 policies:
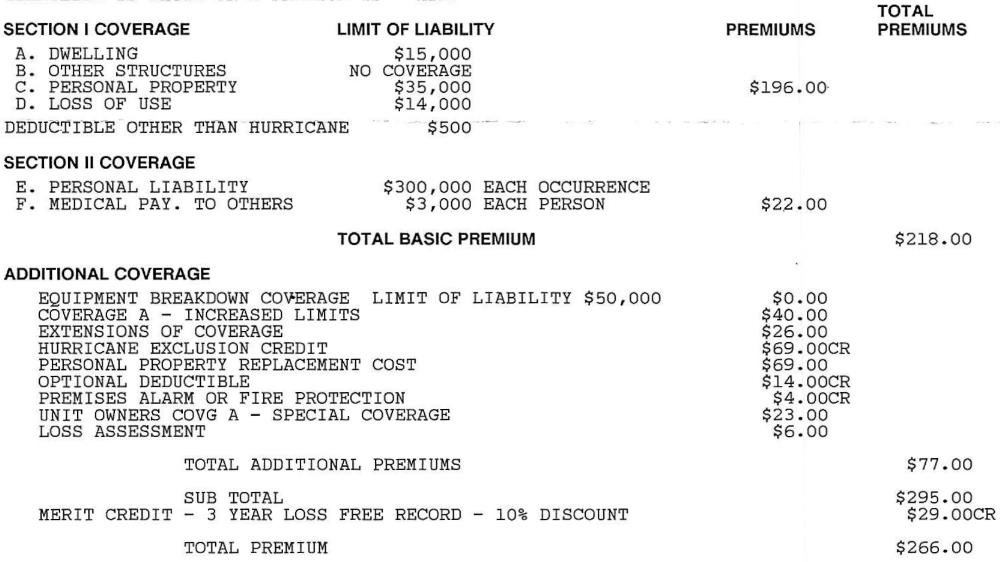
You may upgrade your HO6 policy to cover ‘upgrades beyond originally built’ and increase your coverage for personal belongings.
2) High-Risk Components – Minimizing Flood Risks
As mentioned, the vast majority of condo insurance claims are for water leak damages. Water follows the path of least resistance and can travel undetected to several floors below. Here is a simple checklist of typical high-risk components and how you can properly maintain them to prevent flood damages:
— Washing Machine:
Water Supply Lines (Hot & Cold) – Invest in high-grade steel-braided water supply lines. Or better yet, the Flood Armour hoses have a valve that automatically shuts off the water when the inner hose leaks. Make sure the supply lines are not pinched or kinked in a tight space. Although a quality water supply line could last many years, consider replacing them within 10 years or so.
An even better protection against washing machine leak damages might be this flood stopping/water leak detection and shut-off system. The system shuts off the water flow when it detects water on the floor.
Shut-Off Valves – Check regularly for leaks and functionality.
Drain Hose – Check for kinks and damages.
Drain Line Clogs – Only use high-efficiency liquid laundry detergent. Never use the old style laundry powder detergent that over time can clog your laundry drain line. Prevention is far better than trying to fix a clogged drain. But if you must, snaking the drain line is preferred instead of using harsh chemicals.
— Refrigerator:
Icemaker Supply Line & Shut-Off Valve – Check for kinks and leaks. Check the valve regularly for leaks and functionality. Turn the valve at least once a year, and replace if the valve is frozen.
Refrigerator Seal – Look for moisture build-up and any damage to the door seal. Replace the door seal as needed. Run your fridge at 50% cooling instead of blasting it at 100% full power which could cause water condensation and flooding on your kitchen floor.
— Dishwasher:
Water Supply Line & Shut-Off Valve – Check for kinks and leaks. Check the valve regularly for leaks and functionality. Turn the valve at least once a year, and replace if the valve is frozen.
Dishwasher Drain Line – Check for kinks and damages.
Air Gap – Some dishwasher drain lines have an air gap that is next to the kitchen sink above the counter top. Make sure the air gap cover is not blocked and the opening is facing the sink in case of a water spill.
Dishwasher Rubber Seal – Check for damages and leaks. Run your dishwasher at least once a month.
Dishwasher Drain Filter – Check the drain filter at the bottom of the inside of the dishwasher. A filter that is clogged with grease or leftover food could cause water to drain onto the floor.
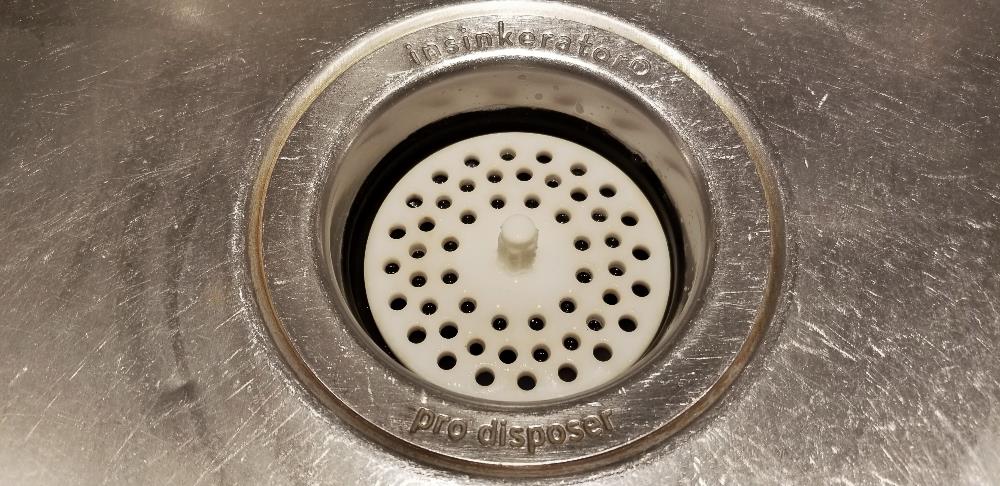
— Kitchen And Bath Sinks/Faucets:
Water Supply Lines (hot/cold) & Shut-Off Valves – Check for kinks and leaks. Check the valves regularly for leaks and functionality. Turn the valves at least once a year, and replace if the valves are frozen.
Kitchen And Bath Sink P-Trap And Drain Lines – Check under the sink for rusted or damaged pipes and leaks. Snake the drain lines as needed to prevent clogging and overflow.
Kitchen sinks are notorious for food residue to go down the drain. Install a kitchen sink strainer to prevent food residue to clog your drain. Preventing your drains from clogging is far more practical than having to snake them after they clog.
Here is my favorite kitchen sink strainer I use in my home and in all my rentals. It is made out of white plastic, cleans well and is reversible.
Faucets– Check faucets for functionality, damages, spraying or leaks above and below the counter. Especially kitchen faucets with pull-out handles can develop hard to detect hose leaks only visible below the counter.
Sink Caulking – Especially under-mount sinks can separate and drop from the countertop creating a small gap that could allow water to enter. Check that your sink is secure and without any gaps. Check at least once a year and re-caulk as needed with mildew resistant silicone caulk.
Sink Overflow – Make sure your overflows are not blocked.
Sink Disposal – A huge misnomer is the ‘sink garbage disposal’ under your kitchen sink. Don’t ever dispose of grease, oil, trash, food waste, bones, coffee grounds, banana peels, and or any other garbage down the sink disposal. All trash including grease and oil belongs in the trash, not down the drain. As mentioned before, always use a kitchen sink strainer to catch all leftover food waste.
Check for rust, leaks, and unusual noise when operating the disposal. Use at least once a month to prevent the motor from getting stuck.
— Toilet:
Water Supply Lines & Shut-Off Valves – Check for kinks and leaks. Check the valves regularly for leaks and functionality. Turn the valves at least once a year, and replace if the valves are frozen.
Tank/Bowl Condition (Rubber Seal Connection) – Check if the tank is loose from the bowl. Flush the toilet and check for leaks underneath the tank. Replace the rubber seal as needed.
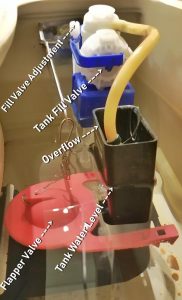
Tank Fill Valves – Remove the tank cover and flush the toilet. Check to see that the fill valve does not spray where it could leak outside the tank. Check functionality that the fill valve stops filling the tank at the correct water level below the overflow pipe. Replacing a fill valve could be relatively simple if you are sufficiently handy.
Flapper Valve – Check functionality that the flapper valve closes properly after flushing. If the water continues to run into the bowl after the tank filled, then confirm that the fill valve is adjusted so that the tank water level remains below the tank overflow. If yes, and the water still runs, then replace the defective flapper.
Wax Ring Seal/Bolts – Check if the bowl is loose from the floor. If yes, your wax ring might be compromised and could slowly leak below without you noticing it! Don’t take a chance. Call a plumber to replace your wax ring, reset the toilet and tighten all bolts.
— What is true for all drains also includes the toilet: never dispose of grease, oil, trash, sanitary napkins, food waste, coffee grounds, banana peels, dental floss, Q-tips, etc.
— Tub:
Valve, Spout & Diverter – Check valve, spout, and flow diverter for functionality, damages, spraying or leaks.
Tub Condition – Check tub for rust, especially around the drain connection and around the overflow. Rust around the drain will further deteriorate and cause an undetectable leak below!
Wall Tile Caulking – It is typical for some settling to occur, especially along the edge of the tub and in the corners of the wall creating hairline cracks that could allow water to enter. Check at least once a year and re-caulk as needed. Use ‘mildew resistant silicone caulk’ instead of grout.
Drain Strainer – Always use a hair strainer to catch all hair from going down the drain!
— Shower:
Valve & Shower Head – Check valve and shower head for functionality, damages, spraying or leaks.
Wall Tile Caulking – It is typical for some settling to occur, especially in the corners of the wall creating hairline cracks that could allow water to enter. Check at least once a year and re-caulk as needed. Use ‘mildew resistant silicone caulk’ instead of grout.
Drain Strainer –Your shower drain cover might be a flat metal grid design. These do little to prevent hair from going down your shower drain. Take the grid cover off and see how the pipe narrows below. If space allows, install two (!) hair strainers inline. In my shower, I installed a large strainer immediately under the cover plate. I installed an additional smaller strainer about 4” below where the pipe narrows to 2” width.

You will be amazed at how much hair each strainer will catch. Clean the strainers as needed and discard hair into the trash.
— Water Heater:
A typical water heater might last 8 to 12 years or longer depending on the design and the manufacturer’s warranty. Eventually, the tank will rust from the inside out without little forewarning! You won’t be able to tell from looking at the exterior of the tank how much the interior has already corroded. A condo water heater might have a capacity of 40 to 80 gallons. If the tank rusts and raptures, it could discharge the entire amount in an instance, plus hundreds of gallons more within minutes! It is crucial to replace the tank before catastrophic failure.
Proper maintenance could possibly extend the water heater’s life expectancy. It is recommended to have a qualified professional flush the tank once a year or as needed to reduce sediment build-up. Also, check the condition of the ‘sacrificial anode’ every 3 to 5 years and replace as needed. This type of maintenance costs little and prolongs your tank’s usefulness.
Changing the artificial anode is best left to the experts. In Honolulu, I recommend Brett Hill Construction, Inc. They offer a variety of home/condo maintenance services including replacing the sacrificial anode.
— Main Water Shut-Off Valves:
In many high-rise condos, the main shut-off valves are often located close to the water heater. Your condo might have one main shut-off valve plus two additional valves, one before, and one after the hot-water tank. Check the valves regularly for leaks and functionality. Turn the valves at least once a year, and replace if the valves are frozen. Check all water supply lines for leaks before and after the valves.
— AC:
Drip Pan & Drain Line – AC units typically have a drip pan with a condensation water drain line. The line can clog up causing the pan to overflow in the AC closet without you noticing it. Check once a month and clean as needed. Consider using drip pan tablets to mitigate scum buildup and clogging. Run your AC at least once a month to prevent the moving parts from getting stuck and prolonging the system’s life expectancy.
Chilled-Water Lines & Shut-Off Valves – Check the AC chilled-water lines and shut-off valves for leaks and functionality.
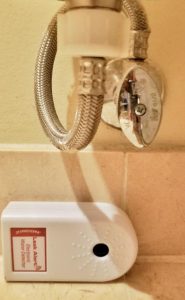
3) Get Water Leak Detectors!
As we discovered, there are several areas within your condo where a plumbing leak could easily develop. I recommend investing in water leak detectors. Some of them come with a wifi feature that will send you an email or text message. These leak detectors are small, affordable and effective in many situations. For a typical 2-bedroom, 2-bath condo you might need about 8 to 10 detectors. Place one detector each below the kitchen sink, fridge, dishwasher, every bathroom sink, every toilet, washing machine hoses, water heater, and the AC unit. Test each detector once a month and replace batteries as needed.
4) Additional Condo Maintenance
Besides mitigating water leaks, there are a few more maintenance routines that you should follow.
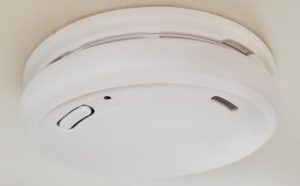
Smoke Detectors – These devices save lives! Make sure each bedroom, hallway, and living room has a functioning smoke detector installed on the ceiling or high on the wall close to the ceiling. They are affordable and effective. High-rise condo fires are relatively rare but can quickly turn hazardous. Test each smoke detector once a month for functionality. Replace batteries as needed. Replace all smoke detectors within 10 years of the manufacturing date.
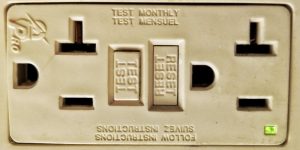
GFCI Electrical Outlets – These devices minimize electrical shock hazards. Check the functionality at least every six months by pushing the test button followed by the reset button. Have a licensed electrician replace as needed.
AC Filter, Intake, And Ducts – Replace your AC filter at least once a month. A clean filter will prolong your AC’s longevity. Instead of disposable paper filters, consider using a multi-stage electrostatic AC filter with a lifetime warranty. You will never have to buy a new filter again. Rinse with warm water in the opposite direction of the airflow, let it dry in the sun and reinstall. These filters work great and will save you tons of money in the long run.
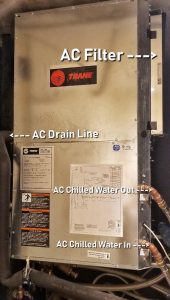
Make sure your AC intakes are unobstructed. Clean the intakes, vents, and ducts as needed.
It is recommended that you turn your AC system on occasionally to prolong the system’s life expectancy. When leaving your apartment for an extended time consider setting your AC to a conservative cool setting of 80-82F (26.7C to 27.8C). At that setting, the AC might work intermittently with little effort.
Dryer – Clean your dryer lint filter after every dry cycle. Many newer condos feature a secondary lint filter/trap with a booster fan behind. You will find these on the wall immediately above and behind the dryer. Some homeowners don’t even know they have them because they are hard to reach. The cover is attached with a spring-loaded mechanism that is hard to fiddle with while standing on a step ladder. You should clean your secondary lint trap at least once every two weeks or as needed once every 2-4 dry cycles or so. Clean your entire dryer vent duct with a vacuum cleaner at least once a year.
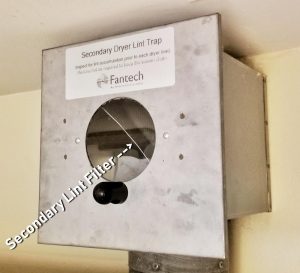
Tip: Get a second replacement lint filter so you only climb up the ladder once. Climb up, remove the cover, pop the old filter out, slide the new clean filter in, and pop the cover back on. Then come down from the ladder and clean the dirty filter to have it ready for the next acrobatic step ladder filter change. Secondary lint trap pic
— Refrigerator Compressor
Clean with a vacuum cleaner any dust or dirt build-up as needed.
— Lubricate Your Lanai Doors And Window Hardware
Against common practice, do not use WD40, grease or oil which tend to gunk up in dusty outdoor locations. Instead, use superior TriFlow or Silicon Spray to lubricate.
5) ‘Lock And Go’ – Make Travel Ready
When traveling for a few days or an extended time, consider these simple preventative steps to mitigate problems.
Fill Up Your P-Traps – Flush each toilet once and run the water in all sinks, tubs, and showers for about 20 seconds to fill up the p-traps. P-traps tend to dry out within a few weeks of not running the water and sewer gases could enter your condo.
When you return to your condo from an extended trip, run the water again for 20 seconds in all sinks, showers, tubs, and toilets refilling all p-traps. You might need to first turn on your water shut-off valves, see next paragraph. Open your windows or run the AC and any potential sewer smell should disappear quickly.
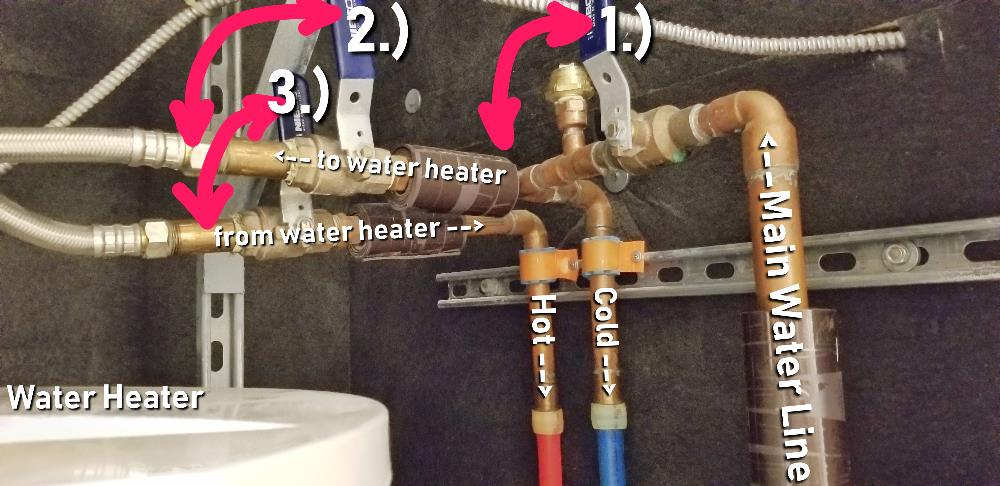
Shut Off The Water – If no one is using your condo for an extended time, then consider turning off the water in your condo. There is no need to have your water lines under pressure.
Shut off your water by turning the respective valve handle to the perpendicular 90 degrees closed position. Start with your main shut-off valve #1 typically located where the water line first enters your condo before your water heater. Then open the hot and cold water faucets at the sink closest to the water tank. Let the water pressure at the open faucet slow to a trickle. And finally turn off the second shut-off valve #2 immediately before the water heater and the third valve #3 immediately after the water heater.
When you return from your extended trip, turn on all shut-off valves and let the water run in all sinks and showers for several minutes to flush the lines.
Turn Off The Electrical Breakers – If no one is using your condo for an extended time, then there is no need to have your water heater heat the water.

Turn off your hot water tank electrical breaker at the condo breaker panel. Your panel might be located in the hallway or behind a bedroom door. You may turn off all other breakers except your refrigerator and possibly your AC.
Your fridge lasts longer if you leave it turned on. Remove all ice from the fridge and turn off the ice maker. Otherwise, in case of a power outage, your ice could melt and flood your kitchen floor.
Instead of turning off your AC at the breaker panel, you could also leave your AC running intermittently at a conservative cool setting of 80-82F (26.7C to 27.8C). Picture breaker panel
Close All Windows And Remove All Items From Your Lanai – This prevents rain and bugs from entering your condo and lanai furniture from flying off during high winds. Close your curtains and blinds to prevent the sun from bleaching your wood floors and carpets.
Let the manager know you will be out of town – Perhaps you have a local contact that can check on your unit once in a while. At least let your building manager know when and how long your unit will be empty. Consider leaving access instructions for the building staff in case of an emergency.
— Conclusion
Condo living comes with fabulous benefits. But your condo also requires some special maintenance to minimize damage and prolong the useful life of its components. Keep this article handy. Tape it to the inside of your AC closet. These tips are simple and can save you tons of money and headaches.
Let us know what you think. We love to hear from you. We are here to help.
Reciprocate Aloha! -‘Like’, ‘Share’, and ‘Comment’ below.
~ Mahalo & Aloha
Aloha George!
I really found your article to be very informative and useful for my property management business! Great checklist when doing property inspections.
I was actually searching for who would be responsible for the water heater pipes in a condo when I came across your article.
You mentioned that maintaining the interior includes plumbing pipes that service the unit exclusively. So pipes hidden within the walls such as the water heater pipes would be the responsibility of condo owners right?
My client’s unit had water stains on the ceiling and high moisture readings. After cutting open a portion of the ceiling, we discovered badly corroded green pipes. The water heater above was old and over time water was dripping. The owner of the unit above is not taking responsibility indicating it’s not their pipes. They are also saying that the owners should be responsible for damage to their own unit.
Aside from the ceiling repair, we also had to repair another portion of the wall because of water intrusion. This time it was the bathroom of same owner’s of the water heater. It was not maintained and water dripped down over time when the facilities were used.
Both owner’s insurance will not cover my client’s cost.
I feel we did our part by hiring professionals to investigate the cause of the water stains on the ceiling and walls. My client had to also pay to have the ceiling and walls restored. We hope to get reimbursed.
This is an ongoing issue that has yet to be resolved. 🙁
Thank you for your article and appreciate your insight!
Mahalo!
George, ran across your article with my GM while refining a ‘High Risk Inspection Checklist’ for our AOAO. I am currently AOAO President and found your article very helpful.
Thanks for your advice and efforts.
Sharon Kensinger, AOAO President, The Shores at Waikoloa Beach Resort
Aloha Sharon!
Cool! Thank you for your kind words. 🙂
Glad we could help.
~ Mahalo & Aloha
Hi George,
I am a resident in Waikiki and recently had a water pipe issue inside the walls. The unit below me reported water leaks. The Association sent out a plumber and discovered a crack at the elbow of the vertical and horizontal line. Now I will tell you that that cracked elbow is not accessible from my unit. The plumber accessed from the unit below through the ceiling. The damaged went l all the way down to the 6th floor (1st floor of apartment units). I just received three separate bills totally $25K. And I am afraid more is coming. The Association said I am responsible for that because it was my pipe that cracked. The Association is only responsible for vertical lines and as an owner, I am responsible for the horizontal lines within my unit. Nowhere in the ByLaws states that I am responsible for pipes that I cannot access from my unit. Insurance refused to pay as well.
Any suggestions on how to deal with this massive bill (when the crack was not accessible from my unit so I wouldn’t have known it was cracked) would be greatly appreciated.
Aloha.
Aloha Ka!
I’m sorry to hear that. Not sure if I’m missing something.
The building’s master insurance policy covers any claims beyond the ‘deductible’ which could be anywhere between $5K and $50K depending on the building.
That deductible may get charged back to you, if you are the owner, especially if the damage claim results from a leak from your unit, even if the leak is behind the wall or below your floor!
That’s why you should always have a current HO6 insurance policy that covers the deductible.
If you do, then your HO6 is on the hook to pay up. If not, then you are.
Or is there more to the story? Let us know if we missed something.
Good luck.
~ Mahalo & Aloha
I live in a large 600 unit highrise condo. My insurance company told me they will not renew my HO6 insurance due to high losses in the building. No other company will insure my unit. I’ve been declined by everyone including HPIA which I thought was set-up to help out with FAIR insurance in high risk situations. What’s going on? I suspect the building is being black listed. This doesn’t seem fair.
when at aoao needs to work on the stacks/ replace them (plumbing in walls)
and they need to go in your unit and tear out drywall who is responsible for repairs
Aloha Renee!
Not enough detail to be sure I understand your question.
AOAO = Association Of Apartment Owners.
— If you own a condo unit, you are also a member of the same association, even if you are not serving as an elected director on the board.
— If you own a condo unit, you also own the proportionate interest in the common elements, including common plumbing stacks behind the walls.
— Repair expenses are typically shared proportionately among the owners to the degree as restoration will be completed to ‘like new, as originally built’ condition.
— If your walls had expensive custom upgraded finishes, you may be responsible for the restoration of those custom upgraded finishes.
—> Check with your AOAO.
Good luck.
How many times a year should you power wash a condo building, say 8 floors?
All Excellent Ideas and recommendations !
Aloha Stan Goldhammer! Thank you for commenting.
You being an expert on insurance matters, should we add anything else to the list? ~ Mahalo & Aloha
George Krischke, Principal Broker, Hawaii Living LLC
See you in a few short weeks✈️
Stan Goldhammer Welcome back and Aloha!